Start
Template Installation
- System Setup
- Home Page Setup
- Creating Informers
- Uploading Files to the Server
- Creating Templates
- Replacing CSS Files
- Restoring Templates
First Steps
Working with HTML Code
Always Welcome!
Merry Christmas is a multifunctional responsive template for a uCoz website.
Pros:
- Cute Christmas design with specially created illustrations
- Responsive layout
- Cross-browser compatibility
- HTML5
- Super icons FontAwesome 4.2.0
- Site Menu Builder support
- Template Builder support
- Builder support
- A detailed installation and setup guide
Notes:
The content in the template is presented as a sample. After you have installed the template, you need to replace it with your own content.
Responsiveness is guaranteed for the modules and pages presented on the demo website.
By cross-browser compatibility we mean correct displaying of the site elements in the latest versions of the following browsers: Google Chrome, Mozilla Firefox, Internet Explorer, Safari, Opera.
We guarantee that the template works perfectly in the E-shop, Site News, Blog, and Photo Albums modules.
System Setup:
Go to Control Panel » Settings » Common Settings:
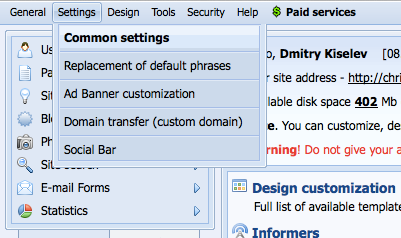
Set the following field values:
Version of jQuery library: jquery-1.10.2.js
< !DOCTYPE > tag value: < !doctype html >
We do not recommend to use the Visual Editor to post entries because it can damage the code integrity and, as a result, the template displaying. The Visual Editor can be disabled in Control » Settings » Common Settings
Home Page Setup
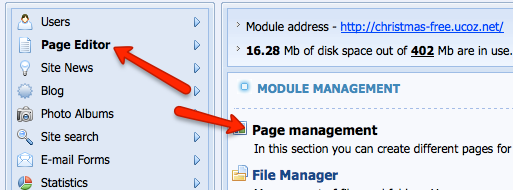
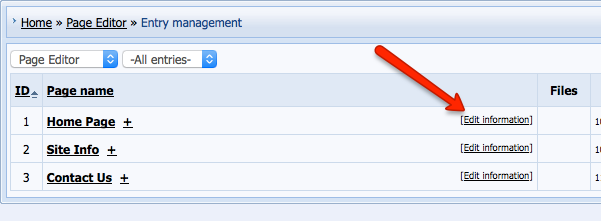
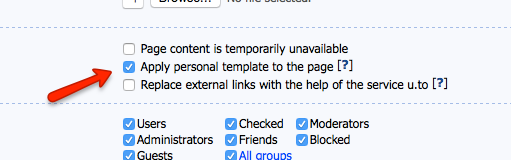
Go to Control Panel » Page Editor » Page Management. Open the home page editing form and enable a personal template for the page:
Creating Informers
You need to create 7 informers. Go to Control Panel » Tools » Informers and create all informers in the same order and with the same settings as on the screenshot below:
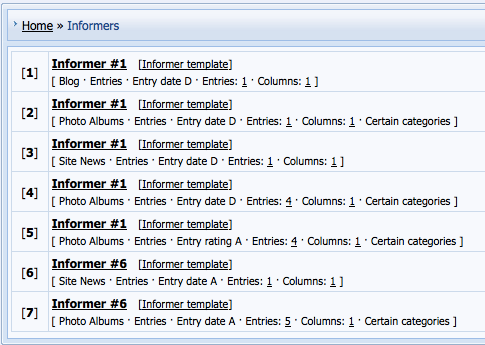
All codes are included into the template archive, into the Informers folder
The informer templates in the Informers folder have the same titles as the informers on the screenshot above.
Uploading Files to the Server
Upload the following folders to the root folder of your website though FTP:
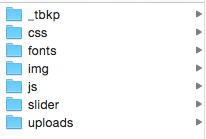
The guide on FTP uploading is available on the Community Forum at http://forum.ucoz.com/forum/37-2500-1. You can also upload files through File Manager, but be attentive in order not to miss any files.
Creating Templates
There is a file named template.html in the installation archive. Open it in a text editor, and copy its content.
Then go to Control Panel » Design » Template Builder, and paste the copied code. Then click on Create templates.
Replacing CSS Files
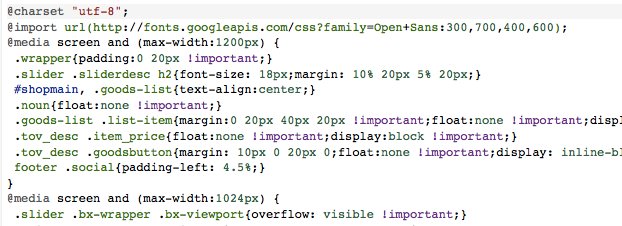
There is a file named my.css in the installation archive. Open it in a text editor and copy its content.
Then go to Control Panel » Design » Design management (CSS) » Common templates » Style sheet (CSS), and replace the whole code with the code you've just copied. Don't forget to click on Save.
There is also a file named shop.css in the installation archive. Open it in a text editor and copy its content.
Then go to Control Panel » Design » Design management (templates) » E-shop » Style sheet (CSS), and replace the whole code with the code you've just copied. Don't forget to click on Save.
Restoring Templates
To finish the initial template installation, go to Control Panel » Design » Template backup.
Here you will find the file *****.zip [*****] – click on Restore near this file.
You have completed the initial template installation.
Working with the Site Menu

It's quite easy to edit the site menu, it doesn't require any coding skills. Just go to Control Panel » Design » Site Menu Builder. Here you will see all menu items:
1) To add a new menu item, click on Add menu item, then fill in the fields in the window that will appear.
2) To edit or delete a menu item, use the following buttons that are available near each menu item: 

3) To add a drop-down menu item, hold the  icon and drag it onto the menu item where you want to insert a drop-down item.
Sliders on the Home Page
Go to Control Panel » Design Customization » Home Page.
Here you will find the following code of the slider:
The code will be available only after the template purchase.
Each of the < li > elements means the beginning of a new slide. Each of them contains an image with the link to the news post, and a short description. Add or delete slides by adding/deleting the < li > blocks.
It is possible to automatically display slides on the home page by creating a new informer. For example, for Site News the informer code will be as follows:
The code will be available only after the template purchase.
In this case you will need to replace the static slider code in the home page template with the informer code:
The code will be available only after the template purchase.
Social Networks
To add (change) links to the social icons, go to Control Panel » Design Customization » Bottom part of the website. Here you will find the following code in lines 10-15:
The code will be available only after the template purchase.
By default there is the # character inside the href="" tag. For example, if you have a Facebook group with the URL https://www.facebook.com/ucoz.web.builder, then replace the code:
The code will be available only after the template purchase.
with the code:
The code will be available only after the template purchase.
In the same way you can replace other social links.
Footer

To replace the text in the footer, go to Control Panel » Design Customization » Bottom part of the website. The text is in lines 5 and 6.

The Our Pictures block is displayed with the help of Informer #7, its design can be changed in Control Panel » Tools » Informers » Informer #7 » [Informer template].
Support
All customers will be able to get new updates of the templates after sending a request and the order number to utemplate@ucoz.net.
If you've found an error, a bug, or if you just want to say 'thank you', you can do this at http://ucoztemplates.com/shop/173/desc/merry_christmas_pro
Attention! Distribution and resale of the template are prohibited!
Appearance of Entries
Go to Control Panel » Design Customization » Site News » Appearance of entries and replace all code with the following code:
The code will be available only after the template purchase.
Go to Control Panel » Design Customization » Photo Albums » Appearance of photo entries and replace all code with the following code:
The code will be available only after the template purchase.
Go to Control Panel » Design Customization » Blog » Appearance of entries and replace all code with the following code:
The code will be available only after the template purchase.